
One of my favorite Japanese traditional sweets, which I eat almost every day. lol
It's quick and easy, and a maker-friendly recipe.
Kudzu Sauce
Tools:
a small pan/pod, table spoon, spatula, cup and jar
Ingredients:
8 TBS of Sugar
4 TBS of Mirin (Japanese sweet sake)
4 TBS of Soy Sause
7 TBS of Water
*2.5 TBS of Potato Starch
*5 TBS of Water
Tips:
Put potato starch into a cup first, then add sugar into the pan with your table spoon, then you don't have to wash or use another table spoon! ;)
Directions:
1. Put all ingredients (except *) into a small pan/pod.
2. Heat them up until the sugar melt.
-Start with medium (high) heat and adjust it as necessary
-You don't have to stir it but keep your eyes on it (it can get burned easily)
3. When the sugar melt, stir *ingredients together and get it ready for adding to the sauce.
-Make sure you use cold (room temperature) water when mixing it with potato starch
-Make sure they are mixed well
4. Put 3 into the pan, and stir it with a spatula until the sauce texture gets thick and clear.
-Low medium heat is recommended
-Be careful because it's now easy to get burned
5. When it gets thick and clear, turn the heat off and quickly pour the sauce into a jar.
-It's hot and thick, so be careful not burning yourself
6. ❤Now it's ready to serve ;)
Dango Dumplings
Tools:
a pan/pod, and bowl
Ingredients:
Desired amount of Glutinous Rice Flour (Sweet Rice Flour, Mochiko)
Appropriate amount of Water OR Silken Tofu (Bean Curd)
*100g of the flour needs about 7-8 TBS of water or 120g of tofu


* Asian market has the left ones ($0.99 ~1.20 per 1lb)
I used the green one in the left picture).
Of course, you can get those rice flours at a local American market (like the middle one) but it's a bit costy ($2~4.00 per 1lb)


* Asian market has the left ones ($0.99 ~1.20 per 1lb)
I used the green one in the left picture).
Of course, you can get those rice flours at a local American market (like the middle one) but it's a bit costy ($2~4.00 per 1lb)
Notes:
Using Rice Flour (komeko) makes the texture different.
*Glutinous Rice Flour is made from Mochi (sticky) rice whereas
Rice Flour is made from white rice.
Rice Flour is made from white rice.
I love sticky ones for dango dumplings, so I use only glutinous rice flour.
However, some people use rice flour or mix them together. It's up to you ;)
Using tofu instead of water slightly change the taste and texture.
Both are really good, so it's entirely up to you! (original is with water)
Both are really good, so it's entirely up to you! (original is with water)
Directions:
1. Boil water in a pan/pod before start preparing dango dumplings
2. Put the flour into a bowl
3. Add either water or tofu (don't mix them, use only one as liquid) and mix them well with your fingers
Water Tofu
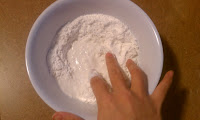


-it's said that the texture should be as soft as your earlobe
-you'll be shaping it so it can neither be sticky nor too dry
Water Tofu


-it's said that the texture should be as soft as your earlobe
-you'll be shaping it so it can neither be sticky nor too dry
- add more flour or liquid as needed
The picture below is an example of too much water, so add more flour for this case

The picture below is an example of too much water, so add more flour for this case

4. When it's ready for boiling, take the bowl to the side of the pan.
5. Pick an appropriate amount of dough, shape it as you like (I like flat circular shape), and put it into the boiling water. Continue to do it.


6. When they're done, pick them up and soak/rinse them into a cold water for a while.


-they will be floating when they're done (see the left picture)
-it's not necessary to soak/rinse them,
but this process makes the dango dumplings more springy! ;)
but this process makes the dango dumplings more springy! ;)
7. Now it's ready to serve ;)

*The left side is with water & the right is with tofu, they do look different in color
You can enjoy the dumpling with the kudzu sauce (mitarashi), soybean flour (kinako), sweet red beans (azuki), soy sauce, soy paste, sweet syrup and more!!
 I hope you like this Japanese traditional sweet!
Love,
*AnyaCco**
love the step by step tutorials! i bet this dessert reminds you of home :).
ReplyDeleteThanks ;)
ReplyDeleteYup, it does really remind me of home...
and I never get tired of eating this! lol
Congrats on your new blog! They sure look great and love your Step-by-step pictorial instructions :) I am following you for more exciting recipe and would also like to invite you to follow me too!
ReplyDeletehttp://personalfoodjournal.blogspot.com/